Getting Started 🚀
Art Locatia App is a digital collectable marketplace that allows people to view geolocated digital art through Augmented Reality (AR) on their mobile devices and buy art from their favourite artists. Art Locatia Studio or "Studio" is a companion feature with the 🎯 goal of helping artists prepare their artwork and metadata for the Polygon blockchain and the Art Locatia App.
Step 1: Prep your Artwork
For your art to be used in Art Locatia, it will need to be in several formats to view it on Google maps as well as through augmented reality on your mobile device. You can create your art digitally or through traditional medium as it suits your style.
Use Blender to create 3D formats
For any artwork, you will need 3 versions, a 2D Your_Artwork.png for the map and to make two 3D models, Your_Artwork.glb and Your_Artwork.usdz using Blender. Blender is rich with features. Give yourself time to have a play with it to understand how to use it for your art.
Download these Blender templates
- A Cube with 6 sides to show your art. cube.blend, 806 kb, binary
- A Panel with 2 sides to show your art. panel.blend, 845 kb, binary
For example, if you made traditional acrylic paint on a paper surface, you can take a picture of it and scan it into a digital 2D png file.
- Open the panel.blend file in Blender.
- Add your 2D png artwork to each side of the panel.
- Adjust how you want to the artwork to look and try different things until it suits.
- When you’re pleased with how it looks, export it to Your_Artwork.glb (File > Export > glb).
- 👍 Now you're ready to use these files in Art Locatia Studio.
👀 Watch creator, Josh Howard, on how to use Blender to transform your 2D artwork to a 3D Model
Step 2: Use Art Locatia Studio
🎯 Create your 3D Models, get map location and create the JSON file to make a smart contract.
 change this with updated version of AL Studio.
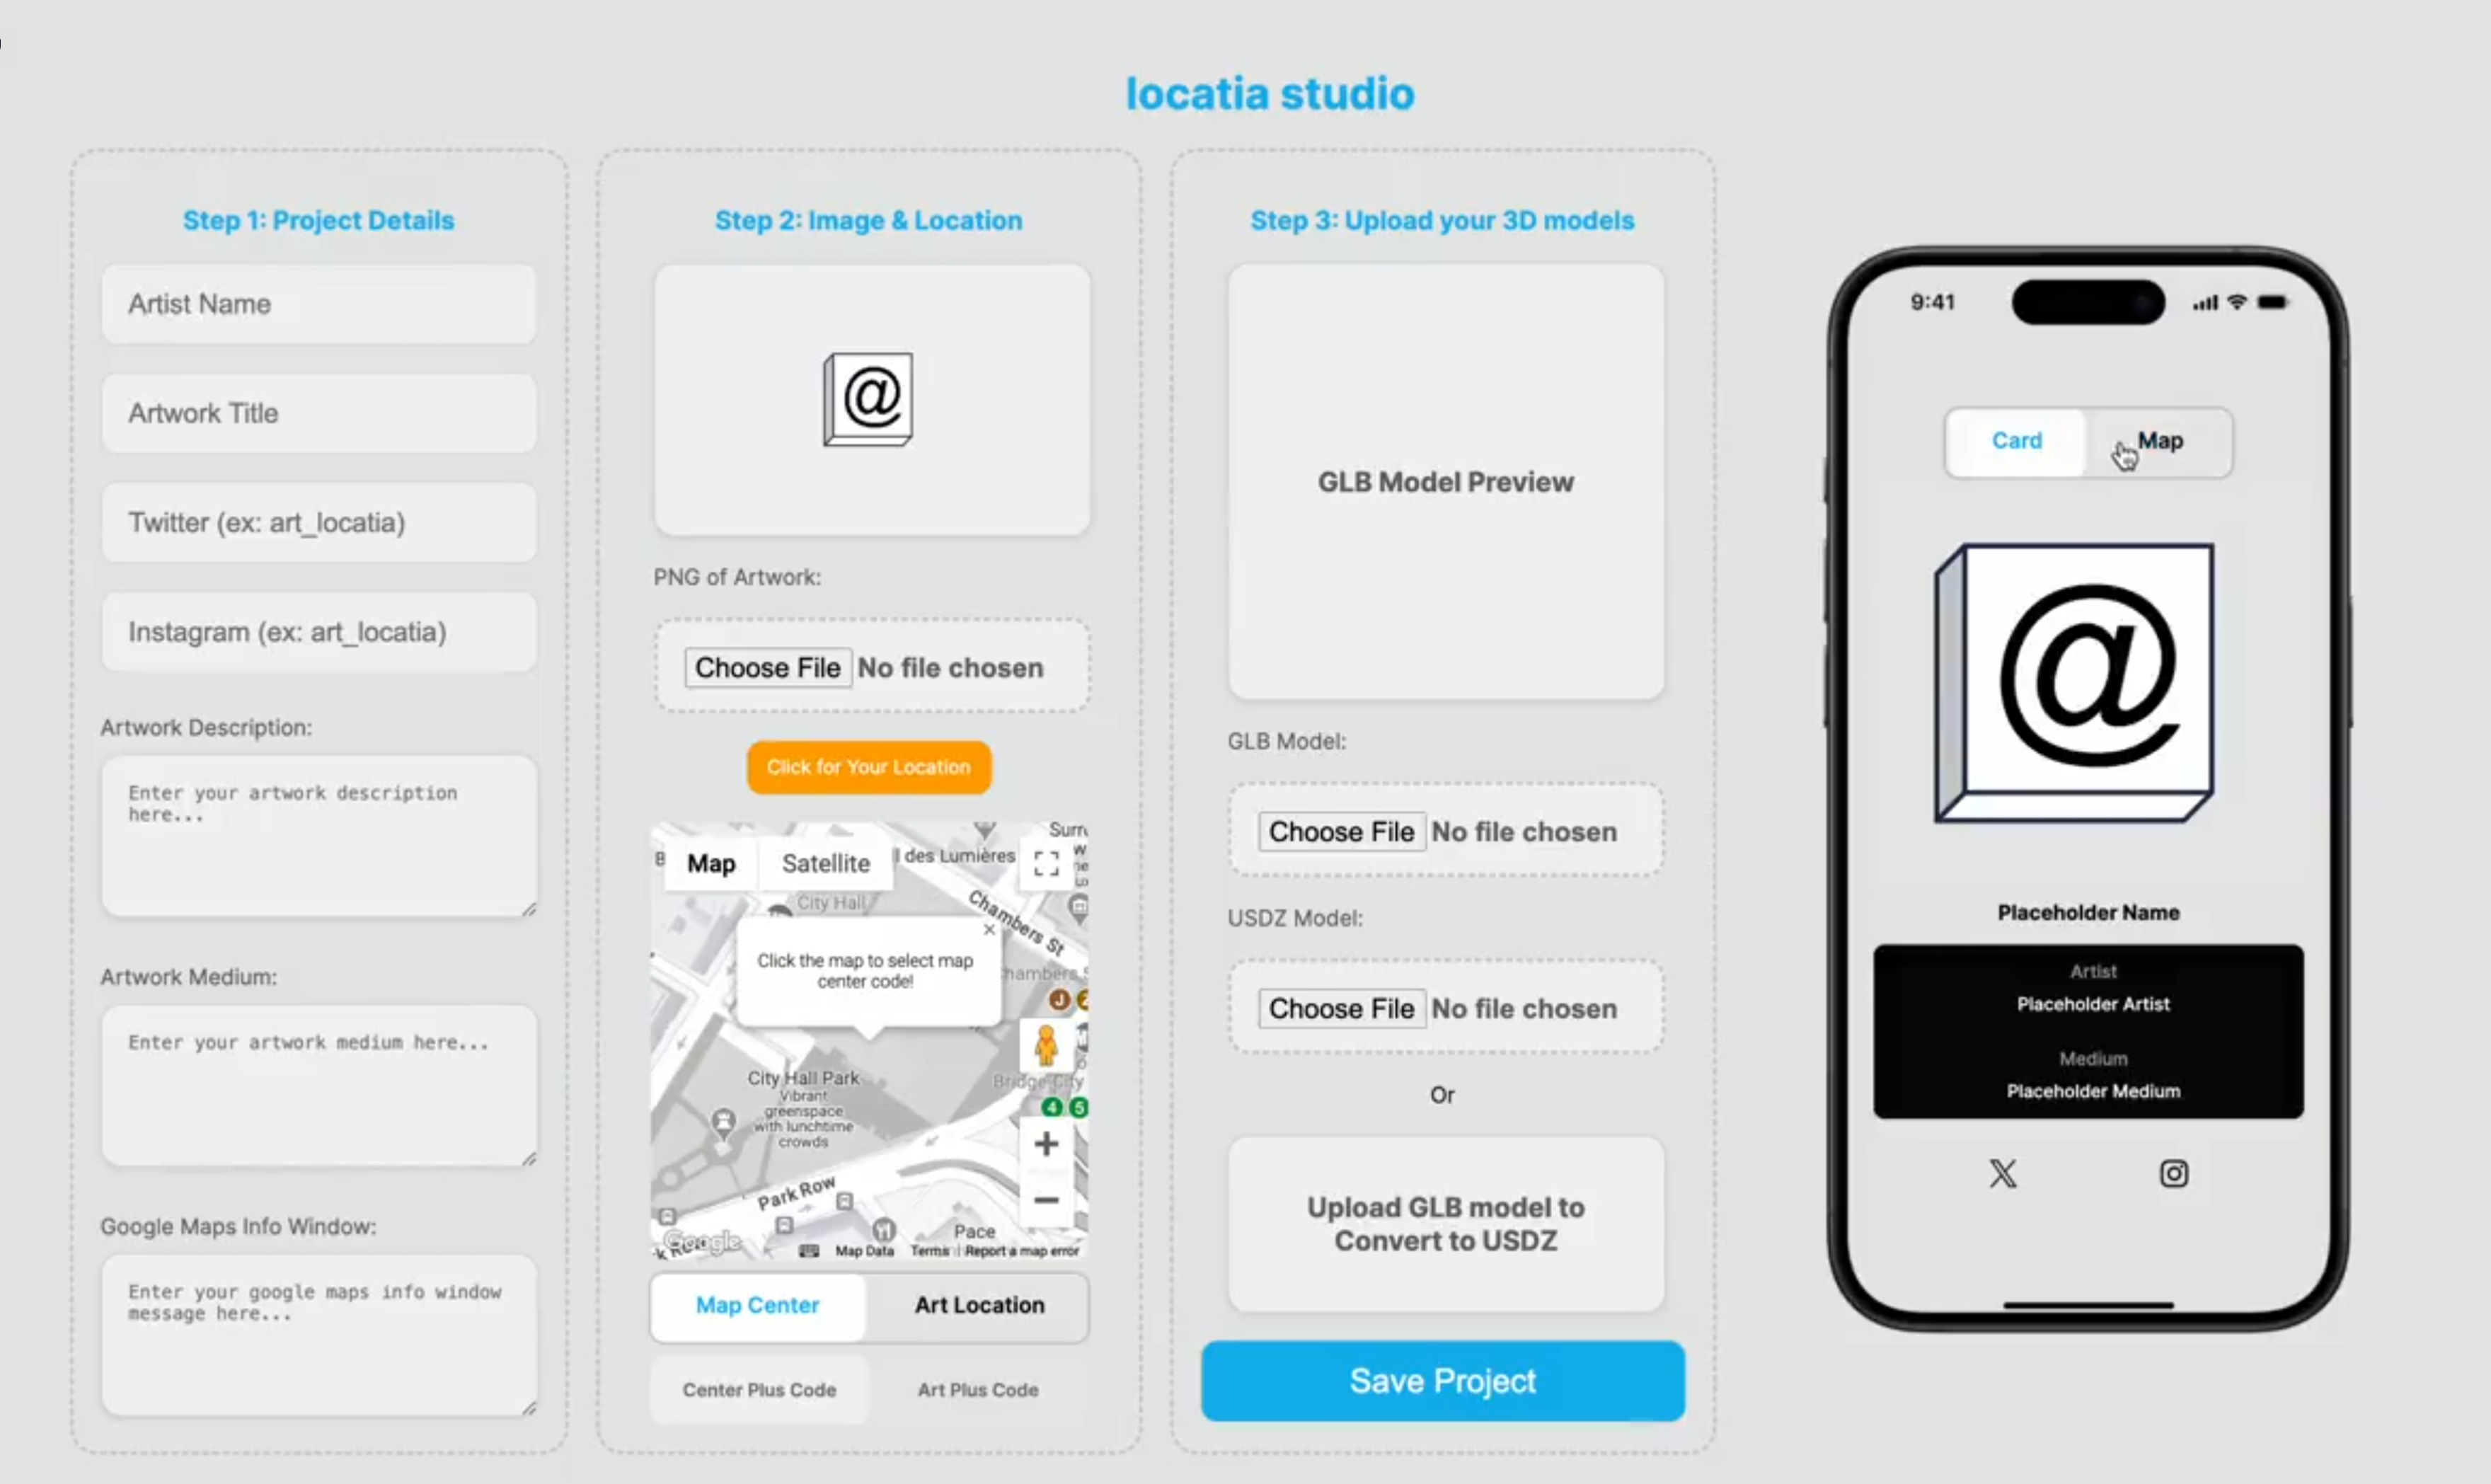
The Art Locatia Studio allows you to create and manage your artwork information.
1: Project Details
- Artist Name: How do you like to be called as an artist?
- Artwork PNG: Upload the Your_Artwork.png image of your artwork.
- Artwork Title: What do you call your artwork?
- Twitter: Your Twitter handle.
- Instagram: Your Instagram handle.
- Artwork Description: Describe your artwork. Note: This will not be shown in the preview.
- Artwork Medium: Describe the art medium used to create your art. e.g. 3D Blender of an abstract painting using Amsterdam acrylics paints on Canson Mi-Teintes paper, 160gsm.
2: Art Location and Google Message
- Google Maps Information: What would the user sees on the map when they click on the artwork image?
- Map Center/Art Location: Select the location of the 3D model of your artwork. The selected location code will be identified and automatically added to the respective field.
3: Upload your 3D models for Android and Apple
- GLB Model for Android: Upload Your_Artwork.glb. Once uploaded, you can preview the model.
- USDZ Model for Apple: You can make Your_Artwork.usdz by selecting "Convert to USDZ" with Your_Artwork.glb or upload a Your_Artwork.usdz model directly.
- Save Project: When you're ok with what you've done, Save your Project. Once saved, you can see a preview of what you entered. Use this time to verify all the information is correct, it makes sense and no spelling errors.
- Please note that all fields are required to save your project.
- When you save your project, all the information is saved to a JSON file you want to download for the smart contract.
- 👍 Now you're ready to upload your JSON file in your thirdweb ERC1155 collection.
👀 Watch creator, Josh Howard, on using Studio to building a Geolocated Augmented Reality Experiences in 3 Easy Steps.
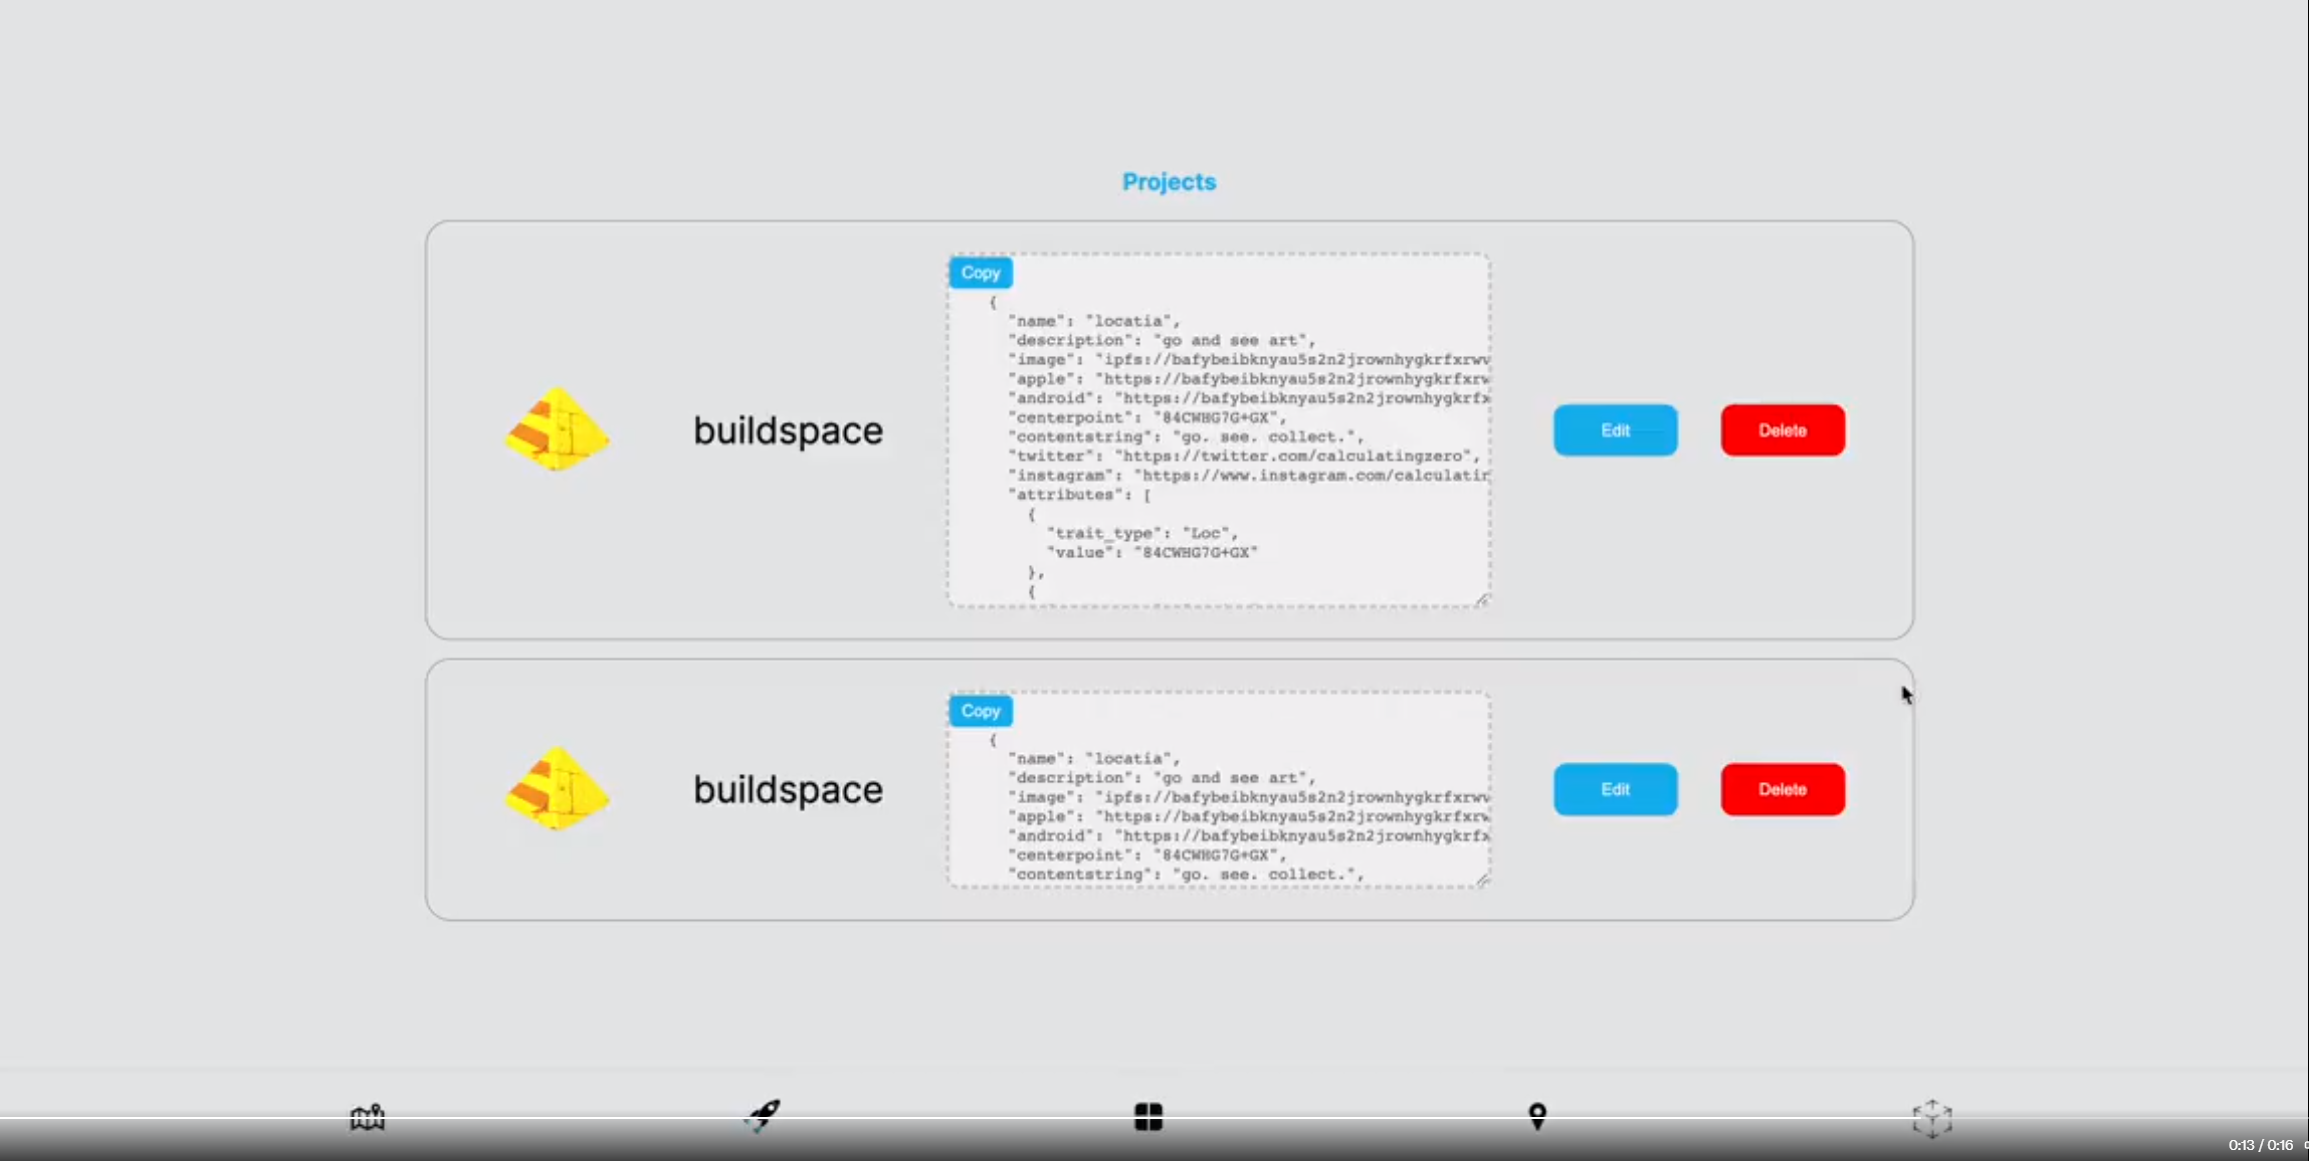
Your Saved Artwork Projects
This section lists all your saved projects. For each project, you can:
- Copy: When you want to use your project details for a next piece of artwork.
- Download: When you want to save copy of the project details to your computer.
- Deploy Options: Are you deploying your art as part of your ERC1155 collection or a unique ERC721A digital collectible?
- Submit Locatia Launch: Are you ready to launch your project to the Art Locatia App?
- Delete: Do you have a change of heart and need to delete your project?
Step 3: Use Thirdweb for Smart Contracts
Thirdweb is a great web3 development toolkit for building web3 projects. We will be using the Thirdweb Dashboard to create a collection and mint your art as an NFT on the Polygon blockchain.
For this example, we are using the MUMBAI testnet to verify all the steps. After you verify, you can use the Polygon Mainnet as the blockchain. It's better to be safe than to be annoyed.
1: Set up ERC1155 Collection
- Sign into Thirdweb Dashboard with your wallet. It might be a good idea to use an account called "Thirdweb" for any transactions. Make sure you have crypto tokens for testing on the MUMBAI testnet and MATIC for the Polygon mainnet.
- Create your Edition Drop ERC1155 Collection and deploy a smart contract for your collection.
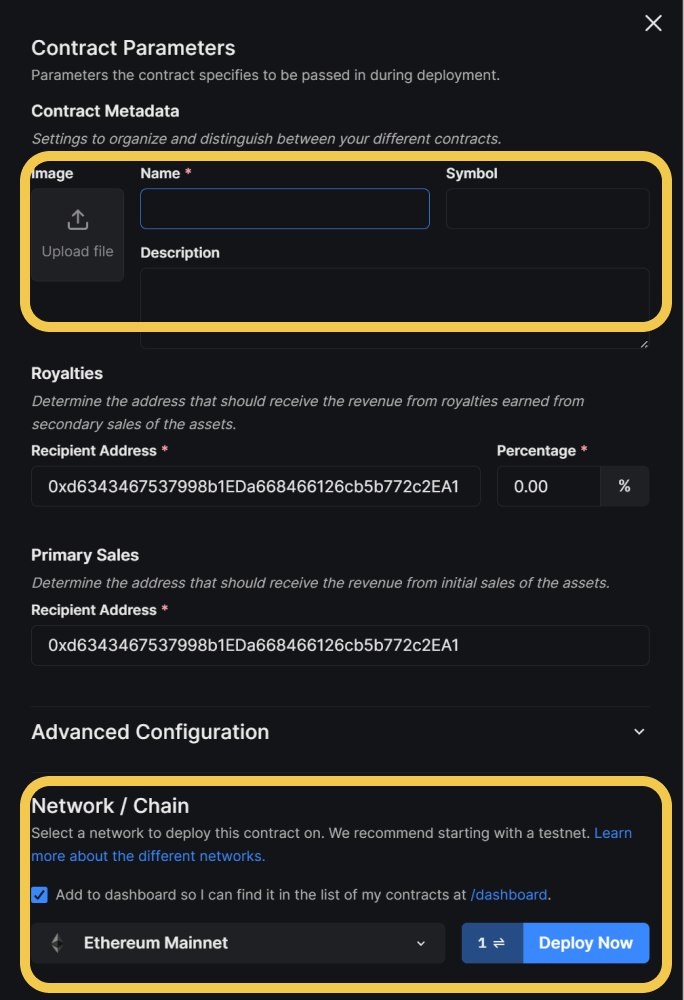
- Fill out the Contract Parameters
- Upload your 2D image or Artist logo.
- Name your collection which is mandatory, so give it a memorable name.
- Describe your art in the description that tells you what the collection is about.
- Give collection a symbol name in ALLCAPS, e.g. MINT
- The royalties and sales part is something you can research and decide upon, but the main thing is the addresses. Use the one you used when you signed into thirdweb.
- For the Network / Chain - start with the MUMBAI testnet to get familiar with thirdweb steps.
- But when you're ready to launch, use the Polygon Mainnet.
- Deploy your Collection, make note of the Collection Address to find your artwork.
2: Deploy the JSON file for your Art NFT
Now that your collection is made, it's time to use that JSON file and add your artwork to it.
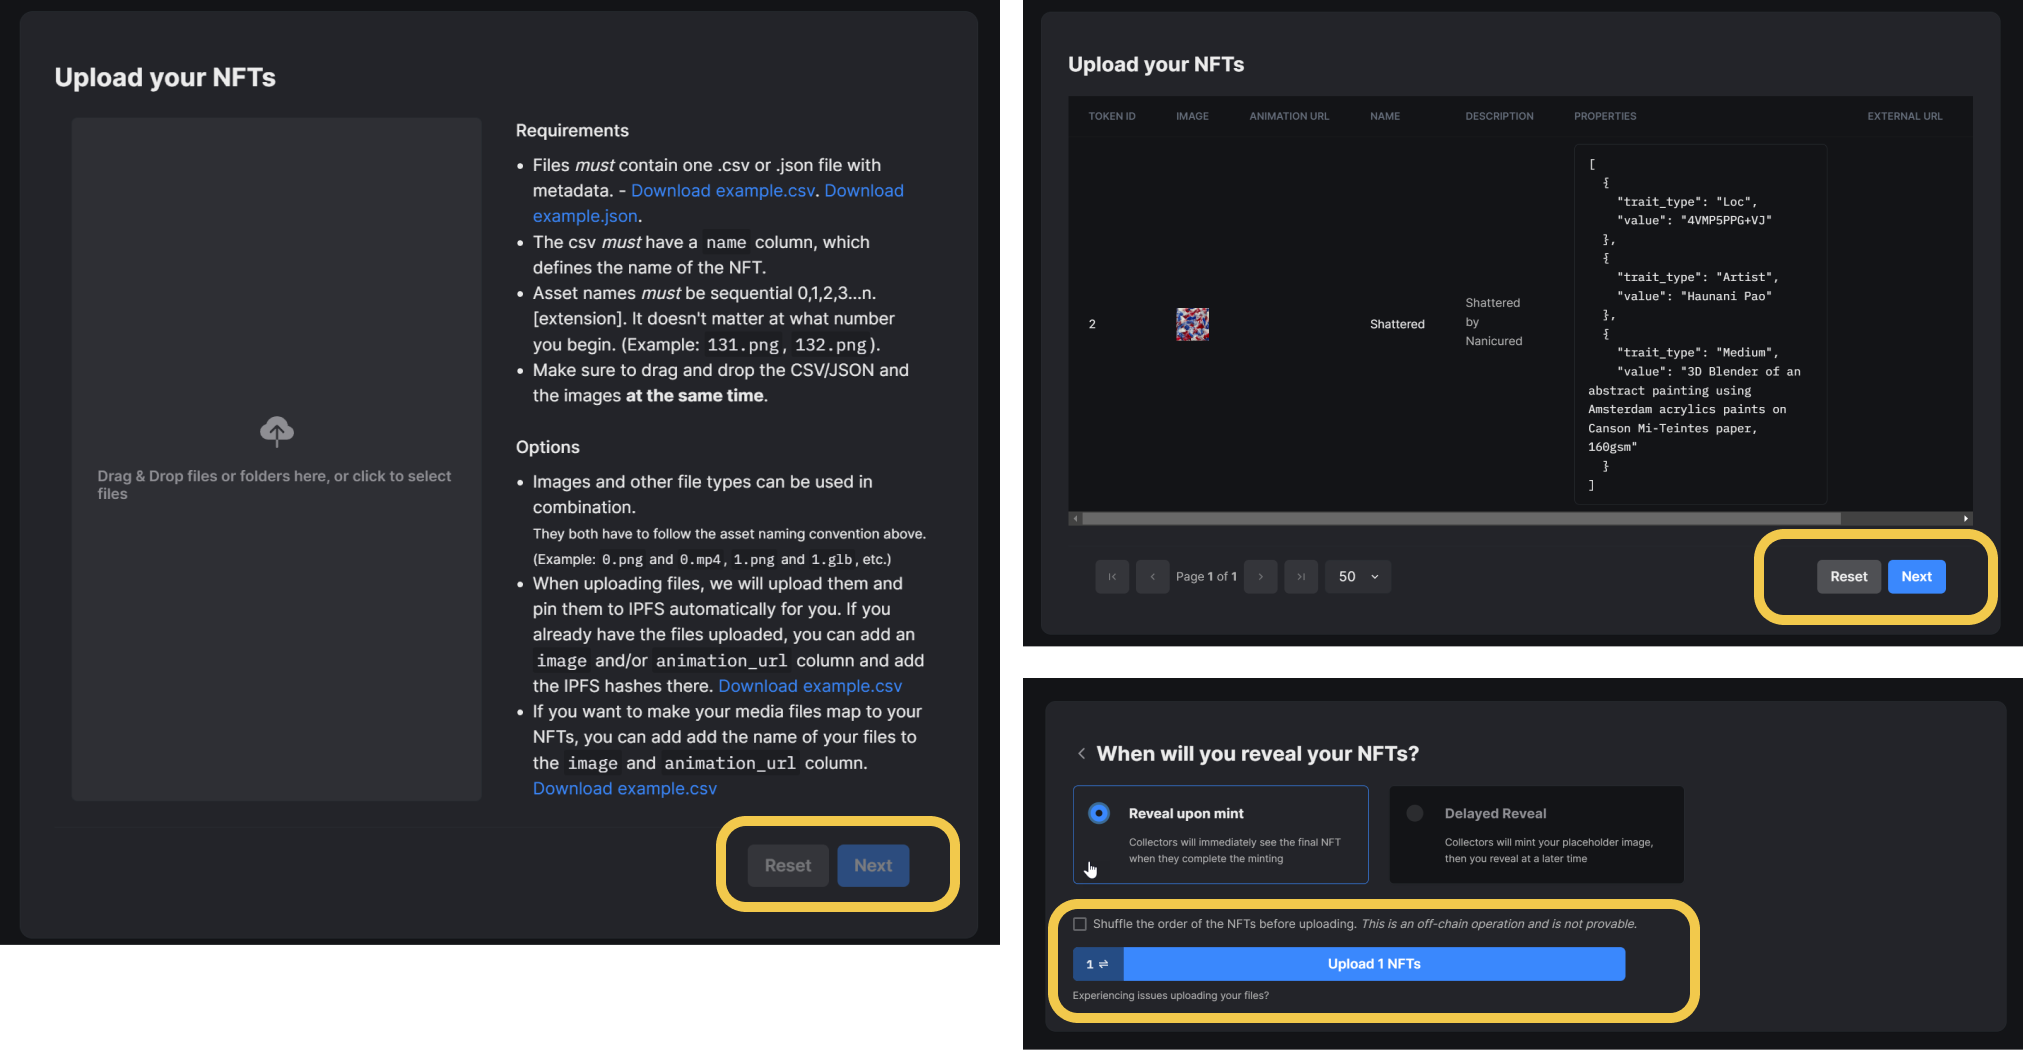
- In your Collection, select NFTs to mint your JSON file.
- Select Batch Upload to upload your JSON file you created in Art Locatia Studio. View and understand the requirements and options.
- View the rendition of the JSON file to verify everything because once you mint it, you can't go back to edit a mistake.
- Select when you want to reveal your NFT as you mint it.

3: Set up Claim Conditions for others to mint.
You're in the home stretch, and all you have to do is set up the conditions for others to claim your artwork.
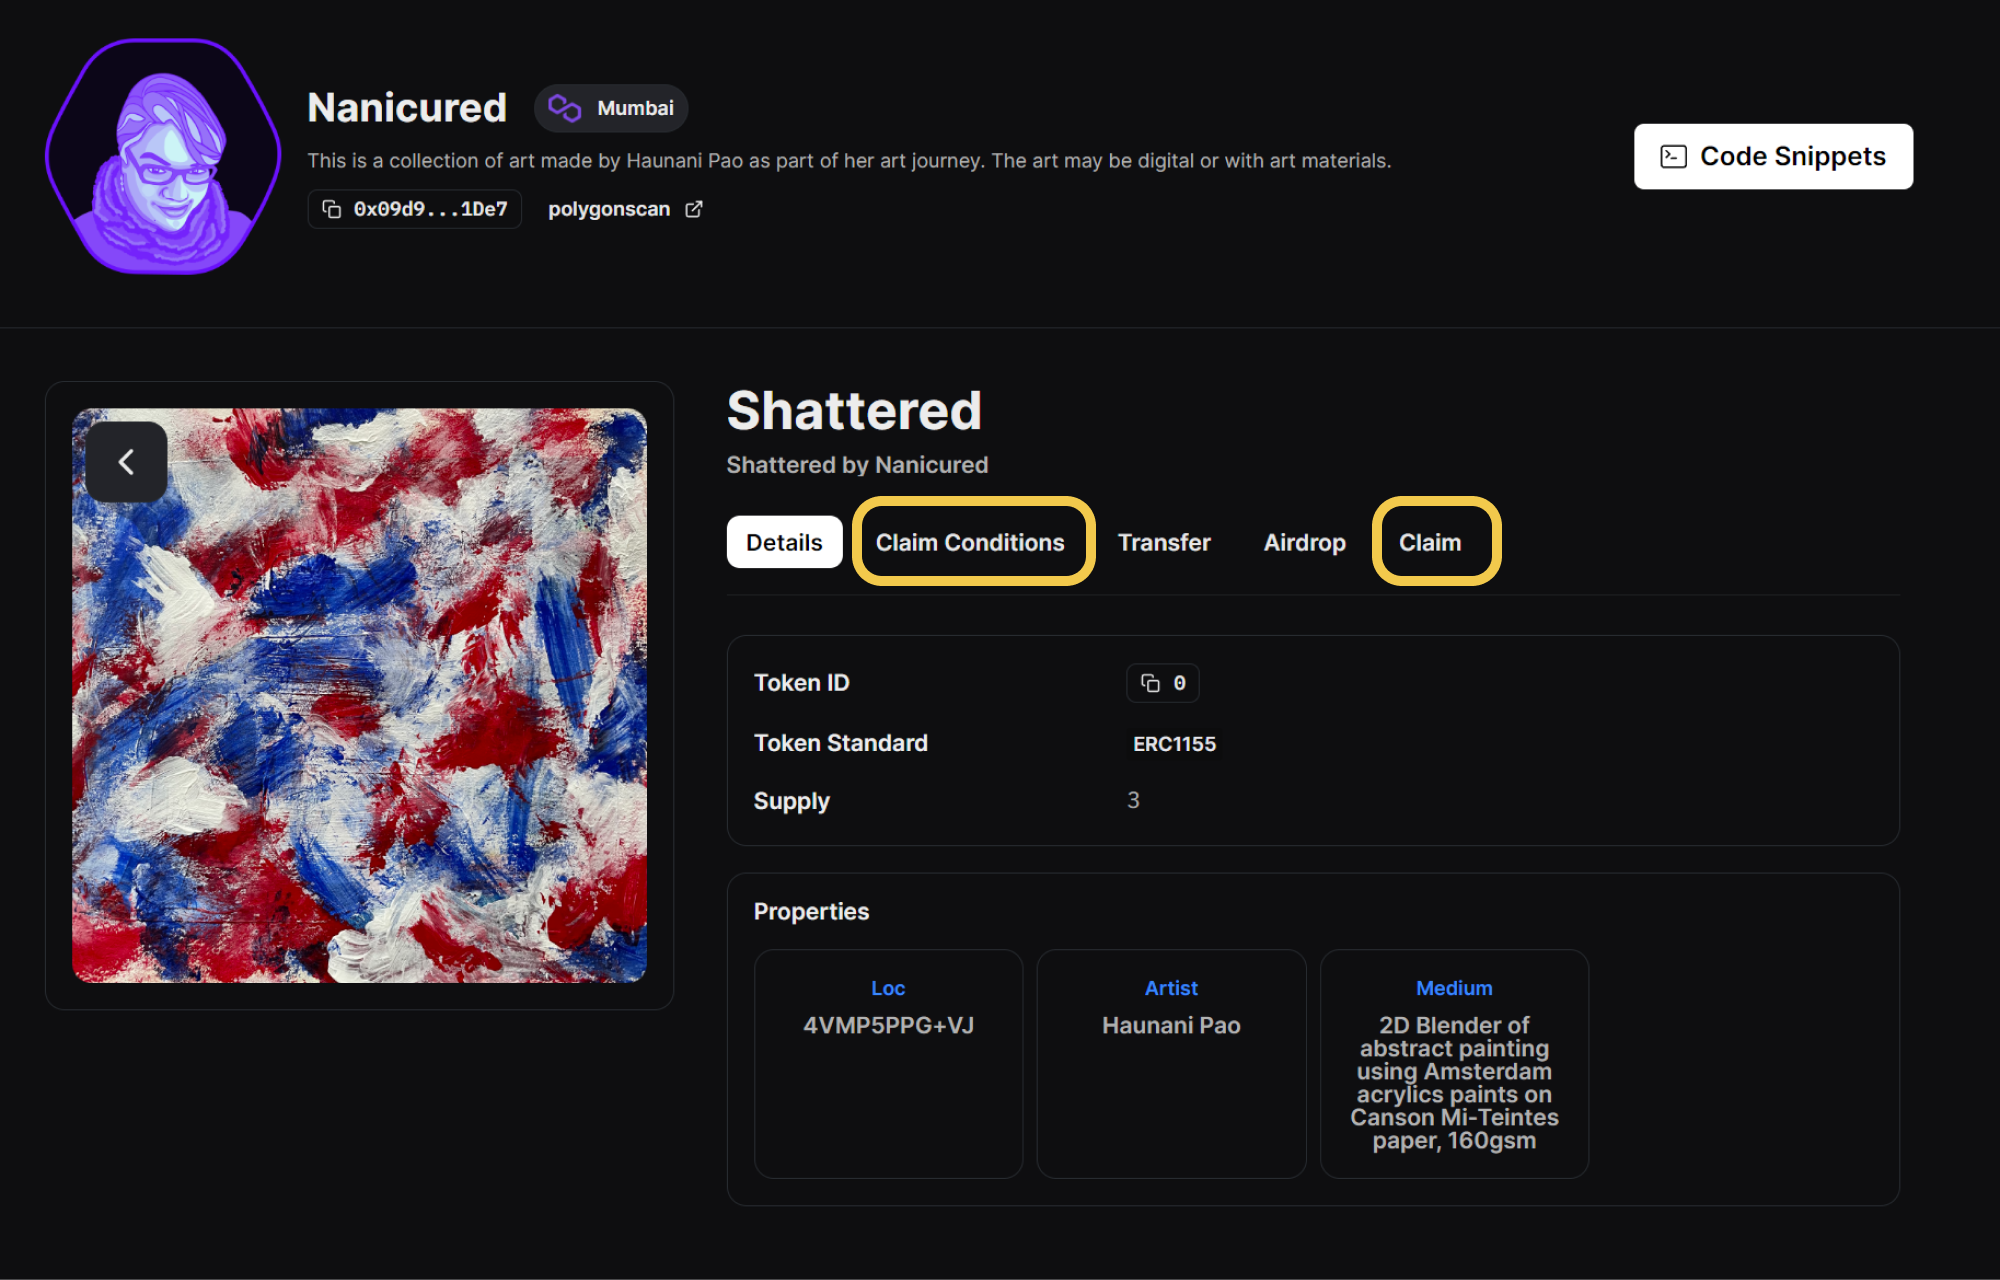
- View the details of your NFT
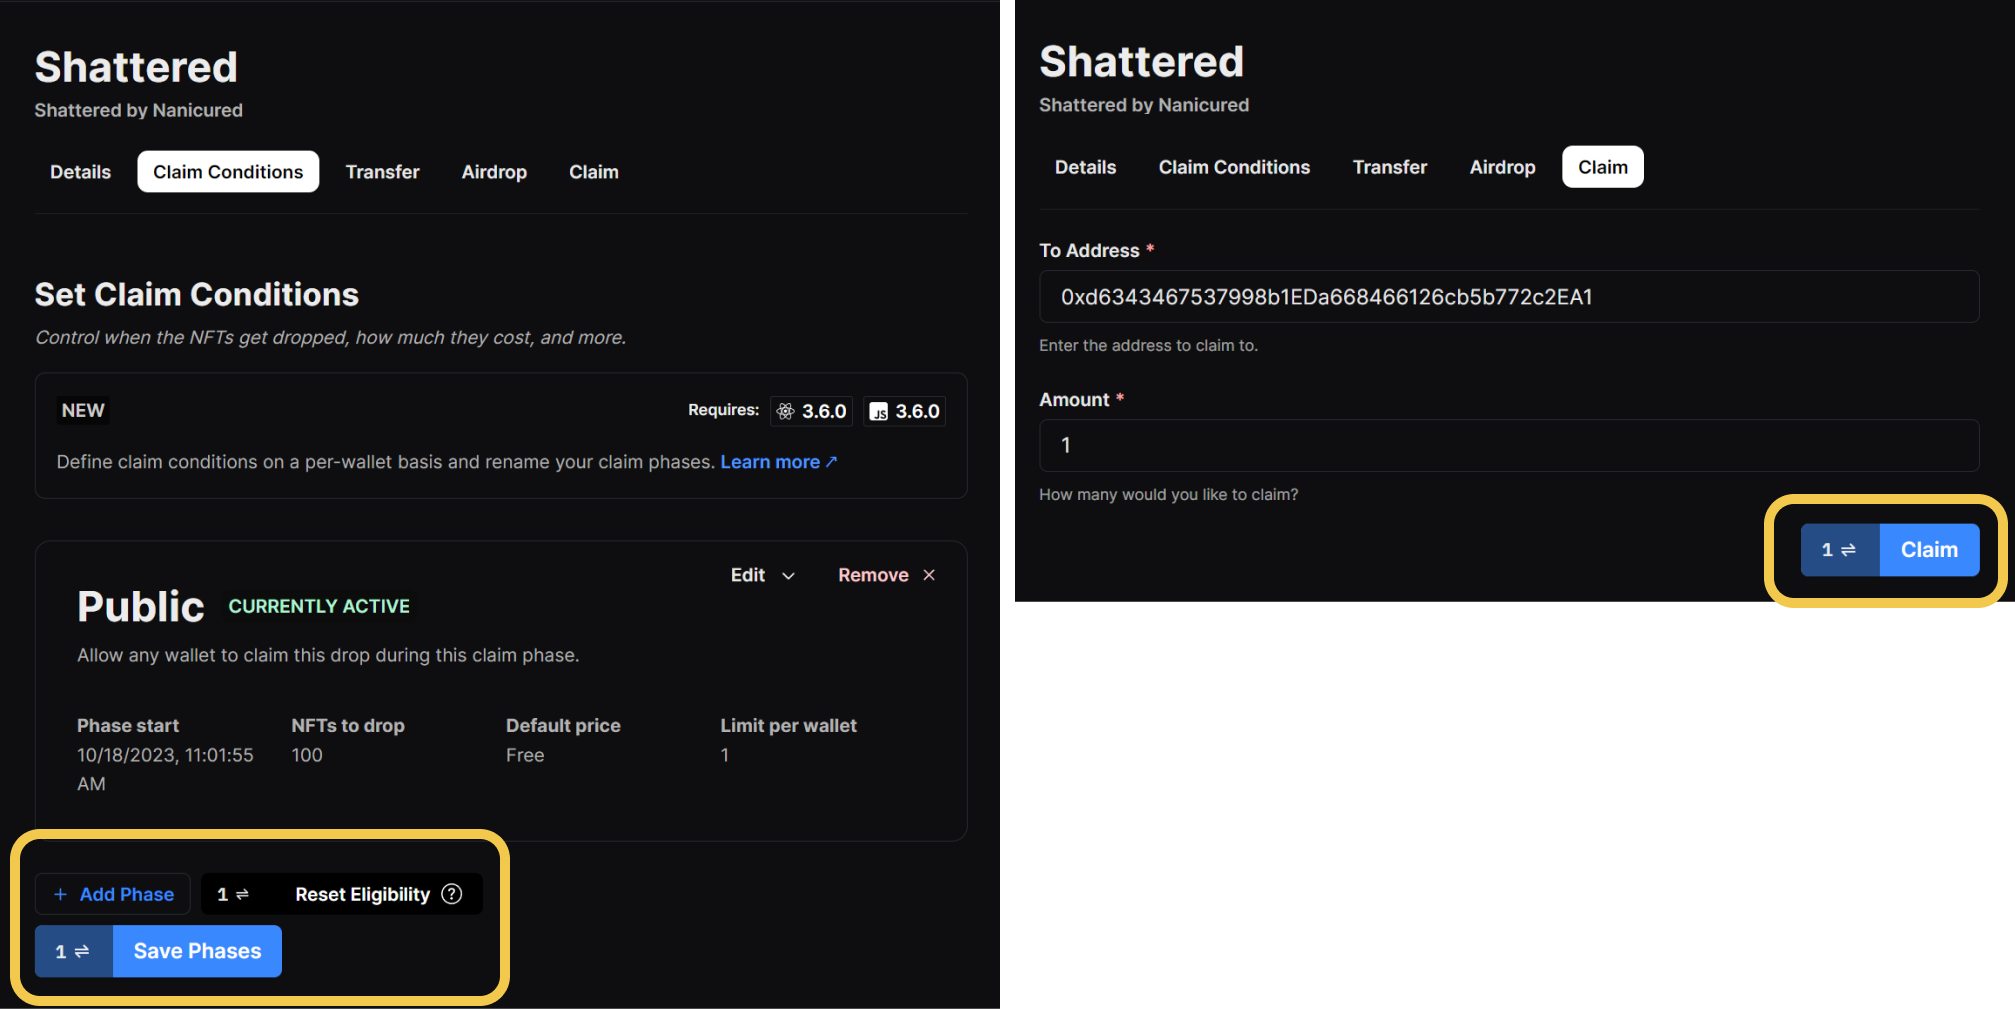
- Go to Claim Conditions and add a public phase with the amount of NFTs to drop and how many can be minted per wallet.
- Go to Claim and mint yourself a NFT.
- Select when you want to reveal your NFT when you mint it.
- Don't forget this is a testnet, so mint yourself a NFT and remember your collection address to view it on the Art Locatia test app. When you launch it on the Polygon Mainnet, you will have to think about how much you are selling your art and any of the claim conditions.

👀 Watch creator, Josh Howard, on using Thirdweb to create an AR art collection for Art Locatia.
Step 4: Apply to be Listed on Art Locatia
Once you have tested your artwork on the testnet, you are ready for Art Locatia and sharing your artwork with others. So just make sure to set everything up for the Polygon Mainnet before you get listed on the Art Locatia app.
Ready to be listed on Art Locatia? Learn more on the last step.
